Hair coat and quality play a large role in making your calf stand out in the show ring. Training the hair on your calf is extremely important and requires daily work. After you’ve rinsed your calf, you’ll need to blow it dry to encourage hair growth and train the hair to work in the proper direction.
No matter how much hair you cow has or doesn’t, it’s your job to make it look its best. You can achieve an awesome, healthy hair coat by following these 5 steps:
- Part the hair first
Before you begin drying your calf, the hair in some places needs to be parted so it lays in a way that maximizes your calf’s appearance. First find the natural separation between the hair of your calf’s tail head and the hair of its hip. Comb the hair on the tail head up on both sides. Next part the hair down the center of your calf’s back and continue that part to the tail head and your calf’s hip. This will create one long straight line from front to back that will allow your calf to look bigger and wider topped. When you begin blowing you’ll want to follow these lines with the tip of your blowing in the direction that you combed. Blowers can be your best friend but they can also cause you a lot of extra work if you’re not careful.
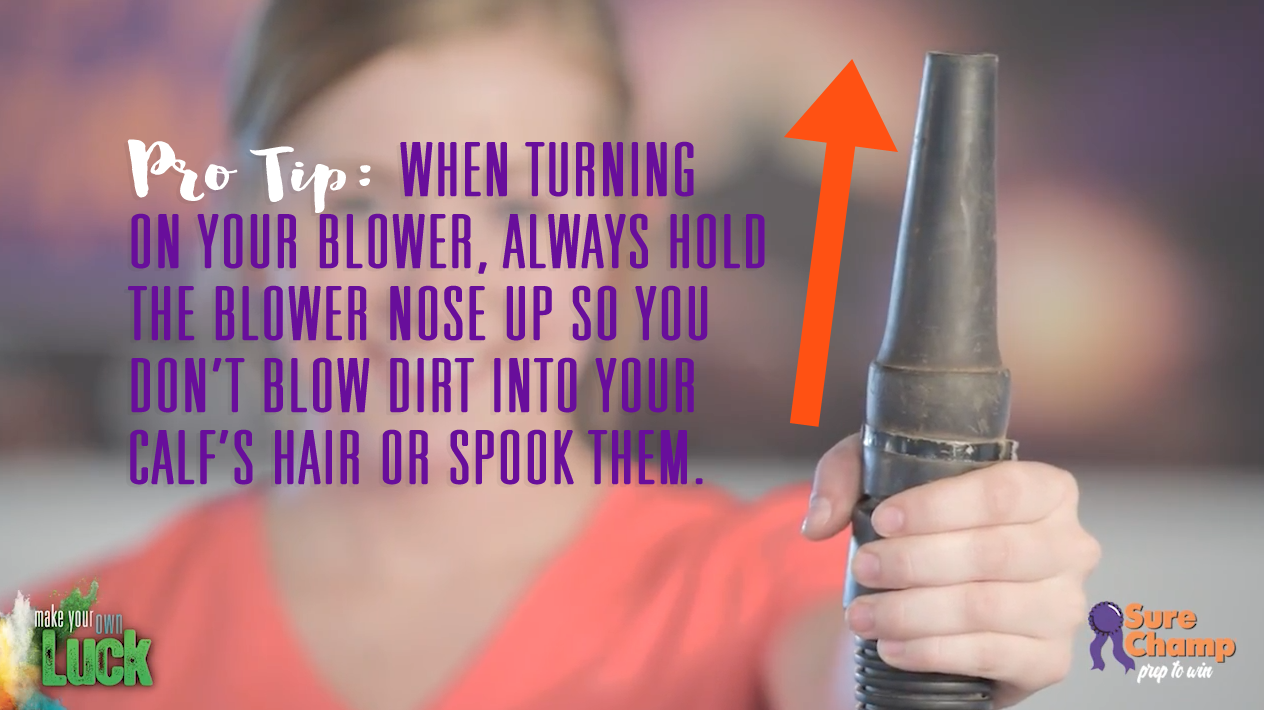
- Hold the blower straight up
When you turn your blower on be sure to hold the end of the blower hose firmly and point it straight up in into the air. If you blower is turned towards the ground you’ll likely blow dirt into your freshly rinsed calf. If you’re not holding onto the blower hose when you turn it on, it’ll whip around unpredictably and might even cause an accident.
- Blow forward at a 45 degree angle
The key to a well-worked hair coat is eliminating the lines or waves to achieve hair that has a smooth, full, straight look. When drying hold the blower close to the hide and blow hair forward or up at a 45 degree angle towards the animals face. Although some people recommend various methods for drying your calf, if this is new to you start at the front of the animal and move towards the back or their hip. You’re less likely to get lines or blower whips this way, as you gain more experience you can start at their hip and work forward towards their head. Getting your calf completely dry will allow conditioners to absorb better, the hair look fuller, clippers cut evenly and adhesives stick better.
- Dry them some more
When you think your calf is dry, keep drying for at least another 15-20 minutes. Not only should the hair be dry but the hide should be completely dry too. After every inch of your calf is free of water, their sides, body, belly, legs and head then you’ll be ready to start working their hair.
- Work the hair
Working the hair is the process of brushing or combing your calf to encourage the hair to grow and lay in the direction you desire. Begin by applying sheen, or a conditioner to your calf’s entire body and comb or brush the product in, follow this buy gently blowing it into the hair coat. For calves with a thick, full hair coat you can blow the hair up alternating the blower motion with a comb. For calves that are slick or don’t have much hair, try to sticking to working the hair at a 45 degree upward angle or straight forward. As you work the hair, alternating between combing and blowing the hair will begin to pop and shine making your calf look like a true show animal.
Watch all of our Make Your Own Luck videos by accessing our FREE Prep to Win Video Library.